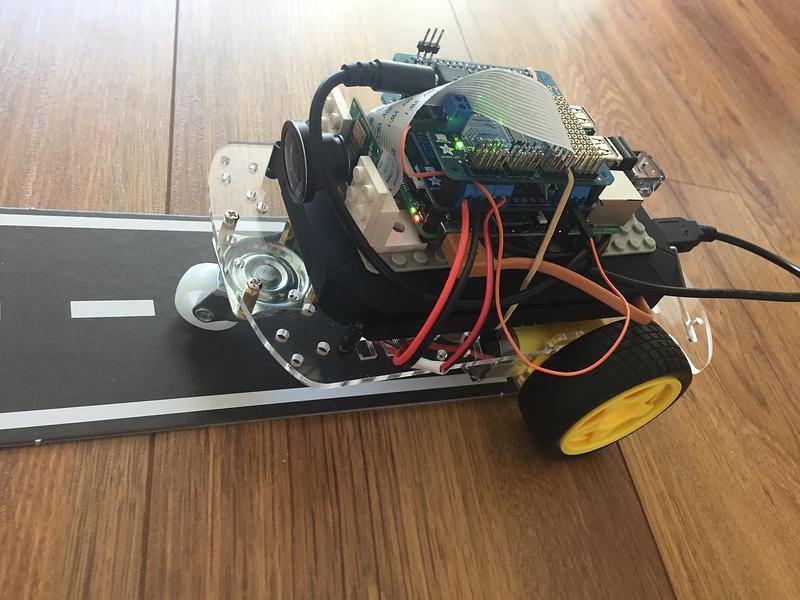
Duckiebot selfdriving car

DIY MIT-project with Computervision and RaspberryPi
Bouwen van de zelfrijdende MIT Duckietown Auto's. Samen met een aantal enthousiastelingen bouwt CreativeHubs de zelfrijdende auto van MIT Duckiebot genaamd....
Aanleiding voor dit project van zelfrijdende auto's komt uit een brainstorm avond met Volker Infra. Zij zijn op zoek naar nieuwe technologieen en visies op de toekomst van ons vervoer.
Vervolgens is een groep bouwers, waaronder CreativeHubs, aan de slag gegaan met het bouwen van Duckietown Auto's van MIT. Deze autos beschikken over visuele mogelijkheden om banen op een weg te volgen en obstakels te omzeilen....
Around the corner:
BUILDING OF DUCKIETOWN BOT
CHECKLIST VRROOM
https://docs.google.com/document/d/1L3xzNKYlcETUcaJawpp4PtKPBKXncKqEOChT4OhjVEs
CHECKLIST DUCKIETOWN:
https://docs.google.com/document/d/1UgCuAcE0WJKja-y0WTXR8pFo9f3srQ4TNtAiX8Nhp08/edit#
CHECKLIST DUCKIETOWN-BUNNY:
https://www.duckietown-bunny.com/tutorials
HARDWARE
STORAGE (around € 250,00 incl VAT and shipping)
Exclusive HDMI-cable, keyboard, mouse, screen, needed for the first setup
1 x RPI
https://www.kiwi-electronics.nl/raspberry-pi/board-and-kits/raspberry-pi-3-model-b
1 x RPI camera
https://www.kiwi-electronics.nl/raspberry-pi-camera-board-v2-8mp?search=pi%20cam
1 x RPI camera behuizing
https://www.kiwi-electronics.nl/raspberry-pi-camera-behuizing-transparant?search=pi%20cam
1 x DC STEPPER MOTOR HAT
https://www.kiwi-electronics.nl/adafruit-dc-stepper-motor-hat-voor-raspberry-pi?search=DC%20hat
1 x SERVO HAT 16 CHANNEL
https://www.kiwi-electronics.nl/adafruit-16-channel-pwm-servo-hat-voor-raspberry-pi-mini-kit?search=servo%20hat
2 x GPIO HEADER
https://www.kiwi-electronics.nl/40-pin-gpio-stapel-header-voor-raspberry-pi-2x20?search=gpio
1 x JUMPWIRES
https://www.kiwi-electronics.nl/jumperwires-bundel?search=gpio
4 x DISTANCE HOLDERS HAT
https://www.kiwi-electronics.nl/messing-m2-5-afstandhouders-11mm-hoog-zwart-2-pack?search=afstand
1 x USB to DC cable
https://www.allekabels.nl/usb-adapter/1724/1084098/usb-power-kabel-5.5mm-x-2.1mm.html?gclid=CNn9zLz9ldMCFcfgGwod3bQK5A
1 x 32 GB SDCARD
1 x USB 32 GB FLASH DRIVE
https://nl.aliexpress.com/item/100-Original-Genuine-Sandisk-Glide-mini-USB-3-0-Flash-Drive-up-to-130m-s-SD/32400110857.html?source=%7Bifdyn:dyn%7D%7Bifpla:pla%7D%7Bifdbm:DBM&albch=DID%7D&src=google&albch=shopping&acnt=494-037-6276&isdl=y&aff_short_key=UneMJZVf&albcp=664365076&albag=32654332494&slnk=&trgt=87981925924&plac=&crea=nl32400110857&netw=g&device=c&mtctp=&gclid=CI268I-CltMCFeQW0wod8fsMiw
1 x CAR KIT
https://www.aliexpress.com/item/Smart-robot-car-chassis-kit-in-other-electronic-components-Speed-Encoder-Battery-Box-For-Arduino-Free/32603428102.html?spm=2114.40010608.4.28.MTqa3F
1 x SOLAR POWER HUB
https://www.solarpowersupply.nl/productgroepen/solar-chargers/xtorm-lava-solar-charger-am114
ROAD:
black foam board
Isolation tape in RED, BLUE, WHITE and YELLOW
SOFTWARE
CLEAN UBUNTU IMAGE
http://ubuntu-mate.org/download/
choose: Ubuntu MATE 16.04.2 LTS for Raspberry Pi 2 and 3 systems
BURN UBUNTU IMAGE ON SD-CARD
ON MAC: brew install xz
WINDOWS: install Win7
xz -d ubuntu-mate-16.04.2-desktop-armhf-raspberry-pi.img.xz
sudo dd if=/Applications/MAMP/htdocs/ubuntu-mate-16.04.2-desktop-armhf-raspberry-pi.img of=/dev/rdisk2 bs=4m
Or use ApplePiBaker to write RPI-images easily
FOLLOW UBUNTU INSTRUCTIONS
Name: {your own}
Computername: alphaduck
Username: ubuntu
Password: ubuntu
Type the command: sudo raspi-config
Change settings:
- expand filesystem
- enable i2c
- enable camera
- enable SSH
Type the command: sudo apt-get update
Type the command: sudo apt-get dist-upgrade
Type the command: sudo reboot
SSH:
ssh ubuntu@alphaduck.local
pass: ubuntu
CLEAN ROS (this may take a while)
http://wiki.ros.org/ROSberryPi/Installing%20ROS%20Kinetic%20on%20the%20Raspberry%20Pi
choose: full install and follow instructions till step 2.3
MAKE SD-BACKUP IMAGE ON YOUR OWN SYSTEM
————————————————————————————————————
INSTALL LATEST DUCKIETOWN DIRs
https://github.com/duckietown/Software.git
Upload to rpi in dir: duckietown
Type the command: cd ~duckietown
Type the command: sudo dpkg --configure -a
Type the command: sudo apt-get -f install
Type the command: sudo pip install graphviz
Type the command: sudo apt-get install python-sklearn
BUILD ROS CATKIN
Type the command: cd ~/duckietown
Type the command: source environment.sh
Type the command: source /opt/ros/kinetic/setup.bash
Type the command: make build-catkin
NOTE: this may take a while… and when it stops more then 5 minutes at 94%, quit process and use the solution beneath. After that, repeat this process
IF ERROR (around 94%)
FIX:
Type the command: sudo dd if=/dev/zero of=/swap0 bs=1M count=512
Type the command: Type the command: sudo mkswap /swap0
sudo nano /etc/fstab
at the end paste: /swap0 swap swap
Type the command: sudo swapon -a
Type the command: make -j4 -l4 build-catkin
CREATE NEW MACHINES-FILE:
Type the command:
sudo nano /home/ubuntu/duckietown/catkin_ws/src/00-infrastructure/duckietown/machines
And paste the next code
<launch>
<arg name="env_script_path" default="~/duckietown/environment.sh"/>
<machine name="alphaduck" address="alphaduck.local" user="ubuntu" env-loader="$(arg env_script_path)"/>
</launch>
Change “alphaduck” to your own veh.name, or use this one for easy use.
CTRL+X and Y to save this machines-file.
BEFORE TESTING THE JOYSTICK
Type the command: sudo apt-get install ros-kinetic-joy
Type the command: sudo chmod 777 /dev/input/js0
TEST THE JOYSTICK AND WHEEL-TURNS
Type the command: source environment.sh
Type the command: source set_ros_master.sh
Type the command: roslaunch duckietown joystick.launch veh:=alphaduck
This is the expected result of the joystick:
left joystick up = forward
left joystick down = backward
right joystick left = turn left (positive theta)
right joystick right = turn right (negative theta)
WHEELS CALIB
STRAIGHT
rosservice call /alphaduck/inverse_kinematics_node/set_trim -- -0.01
SPEED
rosservice call /alphaduck/inverse_kinematics_node/set_gain -- 1.1
SAVE WHEELS CALIB
rosservice call /alphaduck/inverse_kinematics_node/save_calibration
CAMERATEST
Type the command: raspistill -t 100000 -o out.jpg
Type the command: roslaunch duckietown camera.launch veh:=alphaduck
CAMERA CALIB
Type the command: sudo apt-get install ros-kinetic-camera-calibration
Via RPI
Connect screen HDMI
Type the command: roslaunch duckietown intrinsic_calibration.launch veh:=alphaduck
Turn duckiebot around chessboard in several positions till button calibrate shows up.
Than click Commit
Type the command: roslaunch duckietown camera.launch veh:=alphaduck
Type the command: roslaunch ground_projection ground_projection.launch veh:=alphaduck local:=1
Via SSH
Type the command: source environment.sh
Type the command: source set_ros_master.sh alphaduck
Type the command: rostopic list or rosservice list
Type the command: rosservice call /alphaduck/ground_projection/estimate_homography
VIA RPI
roslaunch duckietown camera.launch veh:=alphaduck
rosrun ground_projection test_projection.py alphaduck
rosrun image_view image_view image:=/alphaduck/camera_node/image_mono
rosrun image_view image_view image:=/alphaduck/camera_node/image_rect
DEMOS VIA RPI
Type the command: sudo nano Makefile
make XXX (XXX = the name of the demo in the makefile)
EXAMPLE
Type the command: make demo-joystick-camera
Type the command: make demo-line_detector
And try to run something by clicking your Joystick…
FINALLY DRIVE!!!
Via SSH
Type the command: cd ~/duckietown
Type the command: source environment.sh
Type the command: source set_ros_master.sh alphaduck
Type the command: make openhouse-dp1
Move duckiebot to the camera calibration zone
Press RB then Y to start camera calibration
Press RB again to end verbose mode
Initially, it will be in joystick mode. Press LB to toggle between joystick and parallel autonomy.
Drive = Joystick START
Stop = Drive = Joystick BACK
Or run these separately:
Type the command: make openhouse-dp2-vehicle
Type the command: make openhouse-dp2-obstacle
